


Description
I set out to build an up to date AMD gaming PC featuring the latest FX CPU, the FX8370 running on a ASUS PRO GAMING 970 motherboard. For the GPU I selected the RADEON R9 380X graphics card. The goal with this build was to offer PC gamers a cool & quiet system that looks & runs great; while featuring all AMD core components. Furthermore I wanted the system to readily support current specifications like SATA6G, USB 3.1 and M.2 SSD. Beyond the specification support, I also wanted to have the system look good while not breaking the bank. While not the absolute lowest price build you could specify it offers a solid balance of components that offer great features & functions, solid gaming performance at 1080P and even 2560 for some games all while not compromising on a consistent aesthetic throughout.
If you want to check out the video for the build see the link below. https://www.youtube.com/watch?v=New9z2_2tVQ
Rounding out readiness for 2016 this system ready for DX12, FreeSync and the latest games. For those looking for a little more we also discuss optional upgrades including RGB lighting strips, upgraded CPU cooler and an SSD.
A couple of notes
I wanted to have a different look and feel and instead of focusing purely on a red and black aesthetic that would compliment the 970 PRO GAMING board and the R9 380X STRIX graphics card I went with a third color in white. This provides a nice contrast to the red and black and is offers a more distinctive look and feel especially if incorporating the optional Phantek CPU cooler i used as an upgrade.
Phantek offers the P400 in multiple colors including a black chassis, I do feel if you went entirely read and black it would equally look outstanding but I like the contrast that white offered.
Component breakdown
CPU - We used AMD latest FX series CPU, the FX 8370. It offers up solid gaming performance and higher clock speeds which can still offer solid performance in lightly threaded applications or games. Furthermore it gives you the benefit of further enhancing performance by overclocking it. The FX CPU also comes included with AMD's new WRAITH CPU cooler. This is a solid inclusion in regards to aesthetics, acoustics and temperature performance. Recapping it looks good and is cool and quiet. It even allowed for moderate overclocking. I had no issues wit the cooler being able to hold 4.4GHz under full gaming load. Equally as important whether stock or overclock it was quiet. The inclusion of an LED is nice touch..
Optional upgrade - Phanteks PH-TC12DX - This cooler equally looks great in the build as it has a red heat-sink and white fans. The red aligns with the red lighting and red found on the motherboard and graphics card. The white of course compliments the external white found on the chassis. Small touches are also appreciated in the fact that even the cabling for the fans is sleeved in white helping to keep the color aesthetic consistent. The improved thermal dissipation is also a benefit for users looking to get into the 4.6GHz+ range of overclocking. The large finned heat-sink assembly with multiple heat-pipes does a great job of keeping the CPU cooler even at 4.6Ghz under full gaming load or even stress testing with stress tests like ROG real-bench
Motherboard - Went with the ASUS 970 PRO GAMING this is a refreshed 970 board offering updated I/0 connectivity like SATA6G, M.2 ( bootable ) and USB 3.1. In addition it has a great aesthetic with a clean red and black that is consistent throughout the board. This includes the PCB, PCIe and DRAM slots. There is also RGB lighting built into the south bridge while is a nice touch as it be customized to align with the RGB lighting on the P400 chassis. Overclocking is a very solid. The board features upgraded VRM components ( like 5K capacitors, high quality chokes and mosfets/drivers ) This along with the rich options in the UEFI allowed for easy and smooth overclocking. Even when placed under aggressive CPU and memory overclocks for extended periods the board held up without issues.
Beyond overclocking it has nice upgrades like improved audio, an Intel NIC with packet priority software and even RAM Cache software. This is cool as you can allocate some of your memory to help improve the responsiveness of your hard drive.
Speaking of memory the board has solid DDR3 memory speed / compatibility. Had no issues running 1600, 2133 or even 2400 kits of memory. Generally moving into speeds over 1866 on AMD is more problematic. With the ASUS UEFI and D.O.C.P option it was easy as I can selected the XMP value of the memory allowing for an easy way to have the timings and voltage applied without manually setting them.
In the end we ended up with solid and stable overclock of 4.6GHz.
RAM - G.SKILL has great memory is is extremely compatible and looks good. Both the Ripjaws and Sniper kits would look great as they are red or black. They are very aggressively price. For most 8GB but if you are an extremely heavy application and web browser user it may be worth considering 16GB. This also ensure enough memory even for the most demanding games which can sometimes move it 4 to 6GB of memory usage. Lastly the increased allows you more memory to allocate to the RAM cache function.
Storage - By default went with the 1TB Western Digital HDD. It is a proven drive and offer a balance between reasonable performance and large capacity for games, applications, music, movies, photos and more.
For users looking for outstanding responsiveness from their system a SSD helps. With this in mind I installed the Kingston HyperX Preadotr M.2 SSD. It looks great as it is all black. It has better than standard SSD performance as it PCIe based ( PCIe Gen2 x4 ) IT gives ultra quick boot times, application , game and patching installing as well as great game and application loading. Kingston also has released a very nice utility to help to easily monitor, manage and even update the SSD. This is a nice touch.
GPU - Settled on the 380X a great bang for the buck card. It has 4GB of VRAM perfect for high image quality settings at 1080P. it offers very solid performance in all current DX titles 9, 10, 11 and 12. for some games you can even move into 2560 gaming. It has FreeSync support which is also a nice plus. Beyond that the STRIX card specifically is heavily improved. It is out of the box overclocked, has a full non reference design from the PCB to power components. All have been upgraded for superior performance, lower temperatures and improved reliability. It has a high performance direct contact copper heat-sink assembly to keep the GPU nice and cool even when overclocked. it is quiet under load and even support 0dB mode when you are idling or doing minimal loading on the GPU while at the desktop. The two fans are of course fully tune-able and they has a special dust proof design which double seals the internal hub assembly. This helps to block dust, debris and dander from affecting the fan overtime.
lastly I love the clean design it is pretty much all black and even has a full metal back-plate. Beyond that it looks great from the side especially with the large heat-pipe ( all of which are nickel plated ).
With the improved design including the cooling solution I had no problems overclocking the card. I was able to easily exceed 1100MHz settling in at 1130MHz ( I believe the actual limit is around 1150 but would need to spend more time testing to ensure power target % is not a limiting factor ). For the memory I was also able to crank it up to 6500MHz. Overall very healthy overclock that even when fully under load had the GPU running comfortably around 70c.
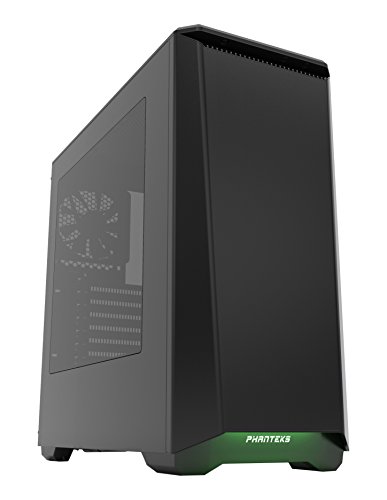
Case - The Phanteks P400 is a new chassis and continues Phanteks tradition of really offering outstanding DIY friendly designs. It looks great with a clean minimal design but subtle angled lines in the front. it has a nice side panel that is complimented by an interior which helps to focus first and foremost on the motherboard and graphics card ( as well as lighting if you mount any ). It has a lot of flexibility when it comes to mounting position for SSDs and HDDs and also a very room interior due to the front area being entirely free of any items. This area can be use to mount front mounted radiators or via optional trays you can mount multiple storage drives. Beyond that it has great cable routing no only on the right hand side but directly underneath which is great for routing many of the cables like front chassis leads, HD audio, fans and much more. Add to that it has integrated RGB lighting for the front of the chassis that can be easily expanded upon by integrating Phanteks LED strips which are now magnetic and you are good to go. Overall it was a fantastic chassis to work with. The upgraded version which features sound dampening material including magnetic dampener panels for the top is definitely worth if you want to prioritize quiet operation.
PSU - Last but not least you have the PSU. I went with Thermaltake's SMART series which are aggressively priced but have a nice balance of features, features some nice aesthetic touches, are quiet in operation and have shown solid and reliable operation. I have used this PSU in multiple builds stock and overclocked without issues. It has proven to be solid in regards to reliability and quiet but under idle and load. Beyond that while it is a lower priced option it has fully black cables which is rare at this price point. In addition they are all flat allowing for easy stacking / layering which can make cable routing very easy.
Bringing the build together there were not really any pain points that have to be detailed or considered. Everything went together smoothly without issue. The only item may be take time to carefully mount the Phanteks cooler if you select it as it has a little more complicated mounting solution. Additionally the fan retention clips which work very well do require a little bit of double checking when installed as you will have to set them in place and then push and rotate them to lock into place. I would also note that I opted to disconnect the fans from being controlled from the chassis fan control option. While this is nice touch I prefer to use the fan controls the motherboard offers. This gives you an easier way to control the cooling and acoustics of system exactly how you want with more precision and ease of use as you can tune the fan curve and operating parameters at the touch of the button within the OS or within the UEFI.
Optional items
Phanteks CPU Cooler PH-TC12DX - https://pcpartpicker.com/part/phanteks-cpu-cooler-phtc12dxbk
Phanteks P400S Chassis - https://pcpartpicker.com/part/phanteks-case-phec416pswwt
Phanteks RGB LED - http://www.newegg.com/Product/Product.aspx?Item=N82E16811984003
Kingston HyperX Predator M.2 SSD 240GB - https://pcpartpicker.com/part/kingston-internal-hard-drive-shpm2280p2240g
G.SKILL Ripjaws or Snuper 2400 RAM - https://pcpartpicker.com/part/gskill-memory-f32400c11d8gxm - https://pcpartpicker.com/part/gskill-memory-f32400c11d8gsr
Comments